
023-68661681
 返回
返回顶部
MyEclipse 3.15 Style——在线购买低至75折!火爆开抢>>
本教程介绍了MyEclipse中的一些基于JPA / Spring的功能。有关设置JPA项目的基础知识,请先阅读JPA教程。 本教程主要关注MyEclipse中的JPA-Spring集成以及如何利用这些函数。您将学习到:
持续时间:30分钟
没有MyEclipse? 现在下载
将JPA和Spring功能添加到Java或Web项目中是最常见的。 本教程使用Java项目来演示这些技术是如何工作的。
注意:您可以下载本教程中开发的项目,然后导入到工作区中。
1. 创建一个名为SampleJPASpringProject的示例Java项目,并向其添加JPA facet 。
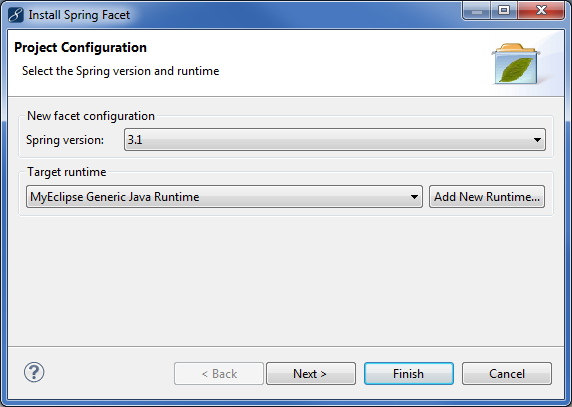
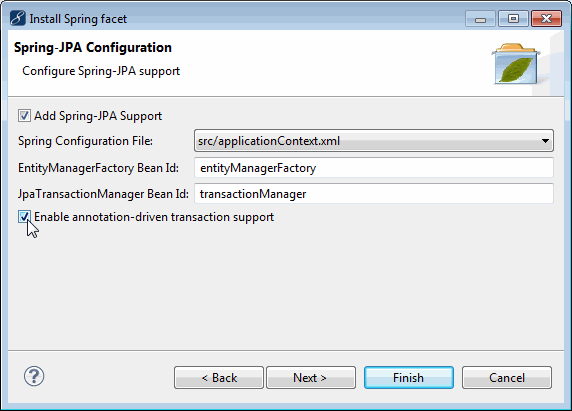
2. 右键单击该项目,然后选择MyEclipse>Project Facets>Install Spring Facet。
3. 单击Next接受Spring版本和runtime默认值。
4. MyEclipse创建一个新的applicationContext.xml文件夹,然后单击Next。
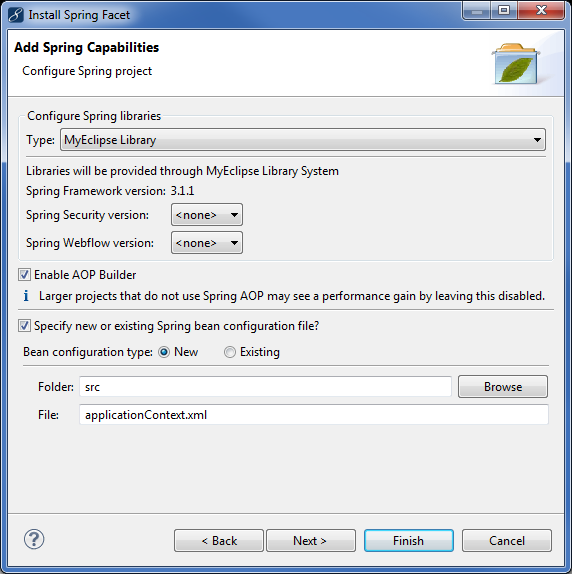
5. 注意Add Spring-JPA support复选框,它指示MyEclipse在这个JPA项目中生成源,将Spring和JPA集成在一起。 因为您将Spring添加到JPA项目,所以默认情况下会选择此项。 此外默认情况下,支持使用@Transactional Spring注释。单击Finish。
注意:Spring Container-Managed Transactions部分介绍了基于注释的事务支持。
既然该项目已添加了JPA和Spring facets,则可以打开applicationContext.xml Spring bean配置文件,并查看项目是如何配置的。 通过单击编辑器底部的Beans Graph选项打开图形视图。
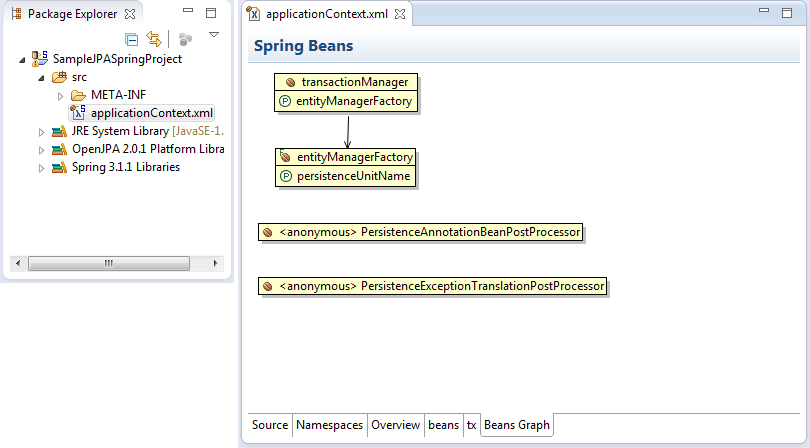
你可以从Spring bean配置文件中看到不同的bean是如何配置的。 transactionManager使用entitytManagerFactory,后者依次使用JPA持久性单元(在添加JPA facets时创建的)。
现在已经建立了项目,您已经准备好将PRODUCTLINE表逆向工程,并开始使用生成的实体。
1. 右键单击src文件夹,然后选择New>Package创建一个用于生成实体的包。
2. 右键单击该包,然后选择MyEclipse>Generate Entities & DAOs。
3. 选择PRODUCTLINE,单击Add,然后单击Next。

4. 填写如下所述的字段。
Java source folder:生成文件的项目文件夹
Java package:您在上面创建的包中放置生成的类的包
Entity Bean Generation:告诉MyEclipse生成的正确标注为用作JPA实体的普通Java类
Create abstract class:如果您想自定义生成的类,而不是每次都覆盖修改,MyEclipse可以生成基本的抽象类以及您可以自定义和使用具体的子类。每次逆向工程时,MyEclipse只覆盖抽象基类,在具体子类中维护您的修改。
Update persistence.xml:与Hibernate类似,您可以列出您在JPA配置文件中使用的所有JPA实体。
Java Data Access Generation:告诉MyEclipse生成DAO实用程序类,使您可以立即保存/查找/更新/删除数据库中的实体。 这段代码包装了JPA实体管理器,使得使用实体和数据库非常容易。
Generate Precise findBy Methods:告诉MyEclipse生成findByXXX方法,其中XXX属于相反实体上的每个属性。 这使得可以使用任何属性轻松访问数据库中的实体,以此作为找到它们的手段。
Generate Java interfaces:告诉MyEclipse生成顶层的DAO接口以及具体的实现(例如IProductlineDAO和ProductlineDAO)
DAO Type:根据生成的DAO的类型,MyEclipse(除了为您生成DAO实现)还可以使用挂接到现有entityManagerFactory的新DAO更新您的Spring bean配置文件。
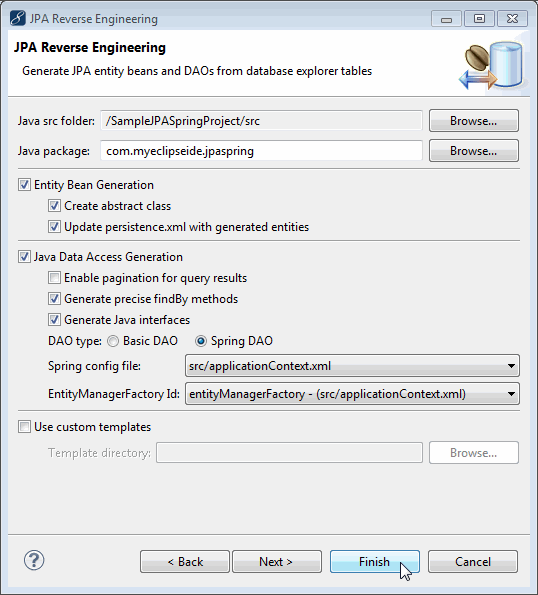
5. 单击Finish完成reverse-engineer表。当逆向工程完成后,您可以再次查看项目的Spring配置并查看更新。

使用更新的Spring视图,您可以看到包含的ProductlineDAO。
现在MyEclipse已经生成了所有这些代码,您可以快速地编写您的业务逻辑。
JPA教程涵盖了实体和DAO类所做的每个操作以及运行简单场景的主要方法基本概述,其中包括:
同样,在本教程中,您将看到如何使用Spring获取和使用DAO以及管理事务。这个演示的起点是RunJPA.java类,看看这个类的主要方法。
/* 1. Initialize the transactionManager and DAO */
ClassPathXmlApplicationContext ctx = new ClassPathXmlApplicationContext("/applicationContext.xml");
txManager = ((JpaTransactionManager) ctx.getBean("transactionManager"));
dao = ProductlineDAO.getFromApplicationContext(ctx);

/* 2. Create a reference to our ID */
String productlineID = "Men Shoes";

/* 3. Save a new productline to the DB */
saveProductline(productlineID);

/* 4. Load the productline from DB to make sure it worked */
loadProductline(productlineID);

/* 5. Update the productline in the DB and check it */
updateProductline(productlineID);

/* 6. Delete the productline from the DB */
deleteProductline(productlineID);
以蓝色标记的代码部分是Spring调用,您可以从bean配置中检索已配置的bean。 请注意,由于您正在手动管理事务,因此还可以从bean配置中检索transactionManager。
其余的项目#2 - #6简单地调用每个 “do something”的方法。
第一个有趣的方法是saveProductline,此方法的目的是创建一个新的实体并将其存储在数据库中。
/* 1. Create a new Productline instance */
Productline newProductline = new Productline(productlineID,
        "Shoes formen.", "<strong>MenShoes</strong>", null);

/* 2. Store our new product line in the DB */
TransactionStatus status = txManager
        .getTransaction(new DefaultTransactionDefinition());
dao.save(newProductline);   txManager.commit(status);
首先,使用一些基本值创建新的Productline实例。 其次,使用transactionManager,事务在将实体保存到数据库之前就开始了。 保存实体后,事务被提交。
手动管理事务的目的是因为作为开发人员,您知道“保存”操作的范围。根据应用程序的编写方式,一些操作可以包含许多DB修改。 把这些全部包装在一个单独的交易中是非常重要的,以防万一中途失败。
下一个方法使用分配给它的ID从DB中检索实体,并显示其值; 这证实了保存操作的工作。
/* 1. Now retrieve the new product line, using the ID we created */
Productline loadedProductline = dao.findById(productlineID);

/* 2. Print out the product line information */
System.out.println("*NEW* Product Line [productLine="
  + loadedProductline.getProductline() + ", textDescription="
  + loadedProductline.getTextdescription() + "]");
注意在这个代码中,没有使用事务。 原因是这个代码只执行一个读操作而不是一个写操作。 即使操作失败,也不会影响数据库中的数据。 所以,没有必要保护使用交易的操作。
现在代码的下一部分可能看起来更长,但这是因为会打印出新的值,并确认记录已在数据库中更新。
/* 1. Now retrieve the new product line, using the ID we created */
Productline loadedProductline = dao.findById(productlineID);

/*
 * 2. Now let's change same value on the product line, and save the
 * change
 */
loadedProductline.setTextdescription("Product line for men's shoes.");

TransactionStatus status = txManager            .getTransaction(new DefaultTransactionDefinition());
dao.update(loadedProductline);
txManager.commit(status);

/*    * 3. Now let's load the product line from the DB again, and make sure
  * its text description changed
  */
Productline secondLoadedProductline = dao.findById(productlineID);

System.out.println("*REVISED* Product Line [" + "productLine="
         + secondLoadedProductline.getProductline()
         + ", textDescription="
         + secondLoadedProductline.getTextdescription() + "]");
注意update调用是用一个事务封装的,因为它必须向数据库写入一些东西,并且需要防止失败。
在上面的第3节中,产品线在更新后立即从数据库加载,并打印出从数据库返回的值以确认更新。
删除实体与保存和更新实体几乎相同。 工作被封装在一个交易中,然后DAO被告知要做这项工作。
/* 1. Now retrieve the new product line,               using the ID we created */
TransactionStatus status = txManager
         .getTransaction(new DefaultTransactionDefinition());
Productline loadedProductline = dao.findById(productlineID);

/* 2. Now let's delete the product line from      the DB */
dao.delete(loadedProductline);
txManager.commit(status);

/*
  * 3. To confirm the deletion, try and load it again and make sure it
     * fails
 */
Productline deletedProductline = dao.findById(productlineID);

/*
 * 4. We use a simple inline IF clause to test for null and print
 * SUCCESSFUL/FAILED
 */
System.out.println("Productline deletion: "
         + (deletedProductline == null ? "SUCCESSFUL" : "FAILED"));
与上面的updateProductline实现类似,您会注意到事务用于包装删除调用,然后代码尝试从DB加载实体并确认操作失败。
注意:事务必须封装findById和delete方法调用的原因是因为由JPA管理的对象必须是同一个事务的一部分。 要删除加载的对象,它必须在它被加载的同一个事务中,试图将其删除。
运行它的输出如下所示:
红色文本是可以忽略的默认日志消息(如果要控制日志记录,可以设置自定义log4j.properties文件)。 在日志警告的下面,您会看到两条来自TopLink(JPA实现库)的消息,然后是三条消息全部来自实现。
第一条消息打印出已添加的新产品线信息,第二条更新消息并打印新信息,最后一条消息从数据库中删除并打印确认消息。
除了用户管理事务外,Spring还通过@Transactional属性支持容器管理事务。 对于容器管理的事务支持,当您添加facets时,必须启用它,在前面的部分已经介绍过。
启用它会将以下事务元素添加到您的bean配置文件中。 您还应该添加一个JPAServiceBean,它用于删除使用容器管理的事务实体。 请参阅下面的实现:
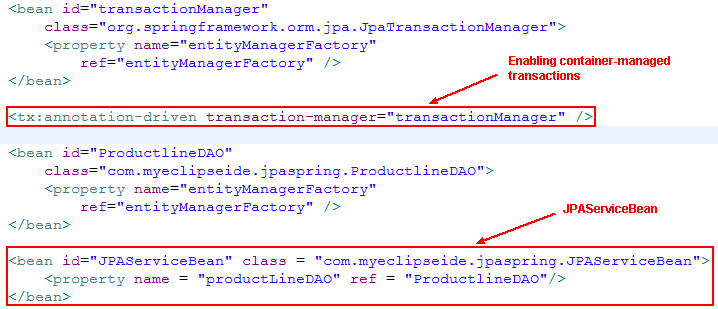
JPAServiceBean实现如下所示;请注意deleteProductLine方法上的@Transactional注释以及缺少任何用户管理的事务语句。
public class JPAServiceBean  {
      private IProductlineDAO dao; @Transactional public void deleteProductLine(String productlineID)  		  { /* 1. Now retrieve the new product line, using the ID we created */Productline loadedProductline = dao.findById(productlineID);  			   /* 2. Now let's delete the product line from the DB */   dao.delete(loadedProductline);  			   /*   * 3. To confirm the deletion, try and load it again and make sure it * fails   */
      Productline deletedProductline = dao.findById(productlineID);
/*    * 4. We use a simple inline IF clause to test for null and print * SUCCESSFUL/FAILED   */
      System.out.println("Productline deletion: " + (deletedProductline == null ? "SUCCESSFUL" : "FAILED"));}  			   public void setProductLineDAO(IProductlineDAO dao) { this.dao = dao; }
}
从应用程序上下文中获取JPAServiceBean的一个实例并按如下所示使用它:
JPAServiceBean bean = (JPAServiceBean) ctx.getBean("JPAServiceBean");
 bean.deleteProductLine(productlineID);